Looking for a way to connect WPForms to Google sheets?
Google Sheets is a powerful automated free collaboration tool. And by integrating your WordPress forms with Google Sheets, you can centralize all your form data in one place. This makes managing, organizing, and analyzing data easier, as you can view all the submissions in one spreadsheet.
In this post, we’ll guide you on integrating your WPForms to Google Sheets using one simple WordPress Plugin: WPSyncSheets For WPForms.
So let’s get started!
Why Connect WordPress Forms to Google Sheets?
Connecting WordPress forms to Google Sheets can benefit you in several ways, such as:
- Data Organization: Google Sheets provides a structured and organized way of storing data collected through WordPress forms. This makes it easy to manage and analyze data and track changes and trends over time.
- Real-time Updates: Google Sheets integration enables real-time data collection, allowing you to have up-to-date information at your fingertips and eliminates the need for manual data entry.
- Collaboration: Google Sheets allows multiple users to access and edit the same document simultaneously, which can be helpful for businesses with various team members or departments.
- Automation: Google Sheets offers several automation options that can be used to streamline workflow processes. For example, users can set up triggers to automatically send email notifications or update data based on specific criteria.
- Customizable Data Analysis: With Google Sheets, you can customize data analysis by creating pivot tables, charts, and graphs.
- Integration: Google Sheets integrates with many other tools, including Google Analytics and Google Data Studio. This makes it easy to connect data collected through WordPress forms to other tools for deeper analysis and insights.
How to Connect WPForms to Google Sheets using WPSyncSheets?
WordPress form builders’ store form data depends on the specific form builder plugin used. However, most form builders store form data in a database within the WordPress installation. When a user submits a form, the form builder plugin typically processes the data and is stored in the database.
By saving your form entries in Google sheets, you can easily manage and collaborate with other team members without sharing the login credentials of your WordPress website.
You can also use the 3rd party tools to integrate your WordPress forms with Google sheets.
But if you’re looking for a dedicated WordPress plugin to save your form entries to Google sheets, WPSyncSheets is the best tool that you can use!
WPSyncSheets is a dedicated WordPress plugin that lets you connect your WPForms with Google Sheets – without hassle. This plugin works as a connector, allowing you to integrate Google Sheets with WPForms.
Some of the notable features of WPSyncSheets For WPForms are:
- Automatically Creates Google Sheets
WPSyncSheets automatically creates Google Spreadsheets to manage all your WPForms data. You don’t need to manually copy and paste the data, and the plugin will automatically update the spreadsheet whenever a form submission is submitted. Plus, you can access the latest data in real time without manually refreshing the spreadsheet.
- Syncs all of your WPForms data to Google Spreadsheets
Managing your data is easy with WPSyncSheets For WPForms. This plugin auto-generates and displays the Entry ID for each form submission in the Google Spreadsheets. You can keep track of the progress of each submission and link back to the original form submission in WPForms.
- Allows to Manage Google Sheets directly from WordPress Dashboard
WPSyncSheets is a user-friendly plugin that offers flexible data control options directly from its settings page. You can clear, view, and download spreadsheets from the settings page without switching tabs or opening Google Drive.
- Freezes First Row/header directly from the plugin’s settings page
WPSyncSheets For WPForms lets you easily freeze the first row or header of your sheet. This feature is accessible from the plugin settings page and helps to keep column headers visible when scrolling down the sheet, making it simpler to navigate through your data.
Now that you know the benefits of connecting your WordPress forms to Google Sheets, let’s see how you can connect WPForms to Google Sheets using WPSyncSheets.
Step 1: Install WPSyncSheets For WPForms
To get started, first, you need to install and activate WPSyncSheets for WPForms.
WPSyncSheets offers both Free and Premium versions of its services.
You can try the lite version of WPSyncSheets and later switch to the paid version for more advanced features.
To install the free WPSyncSheets For WPForms, go to your WordPress dashboard, and click plugins >> Add New.
On the plugins’ page, search for WPSyncSheets For WPForms, and install it on your website.

In order to get WPSyncSheets For WPForms’ premium version, go to the plugin’s official pricing page, select an option, and purchase it.

Step 2: Connect WPSyncSheets For WPForms with Your Google Account
Once you install the plugin, you need to connect WPSyncSheets For WPForms with your Google account.
You will need a Google API key and an OAuth 2.0 client ID for that.
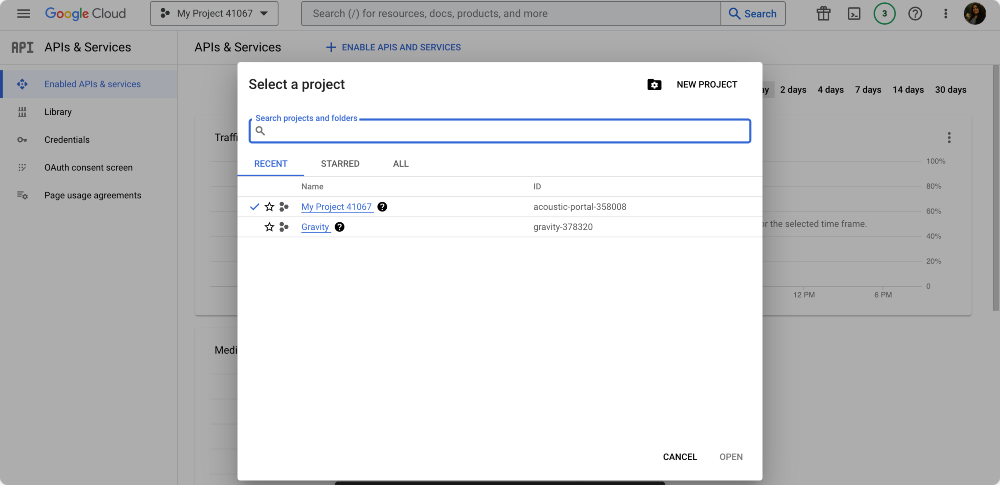
To get your API keys, go to the official website of Google Developer Console, and Click on the CREATE PROJECT button or select an existing project from the Select the Project section.
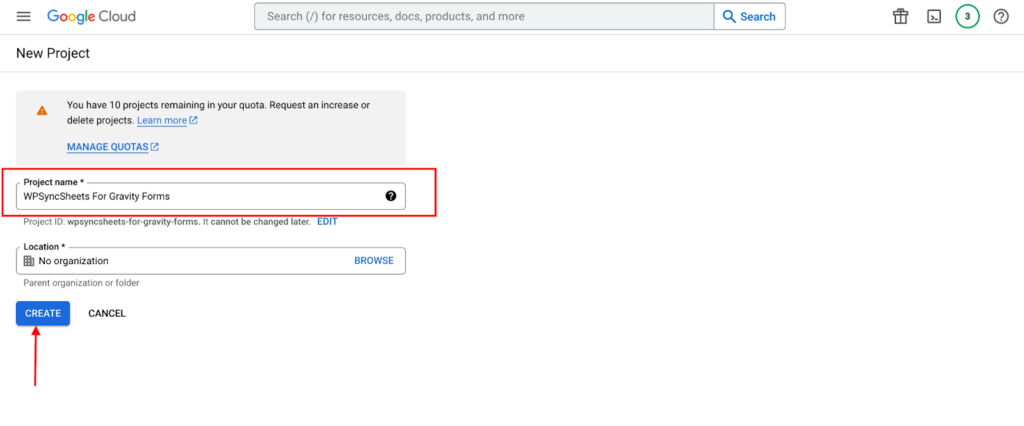
On the next page, enter your preferred Project Name and click Create.
Next, enable the APIs and services for the newly created project. This can be done by clicking Enable APIs & Services.
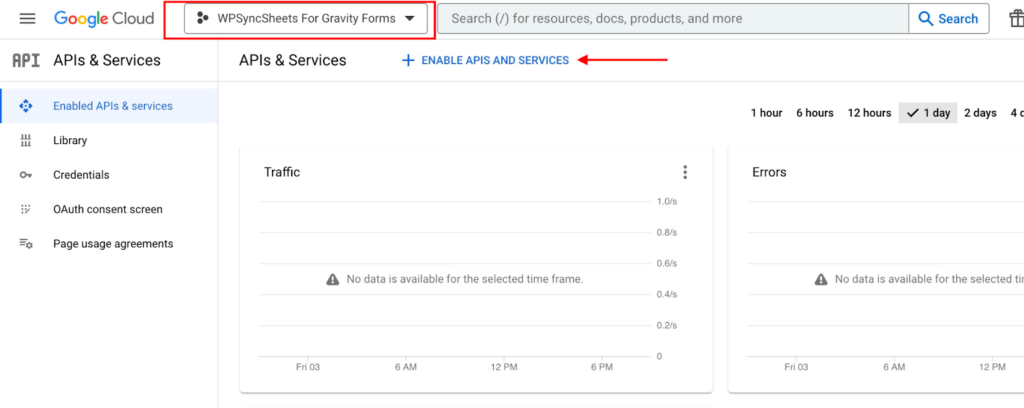
By clicking this, you will be taken to the Google API library. Search for the Google Drive API, and click the ENABLE button.

Again, click on the Library tab on the next page.

When you click this, you will be again redirected to the Google API library. Search for the Google Sheets API, and click the ENABLE button.

Great! You have successfully enabled Google Drive and Google Sheets APIs.
On the project dashboard, click OAuth Consent Screen, select External as user type, and then click Create.
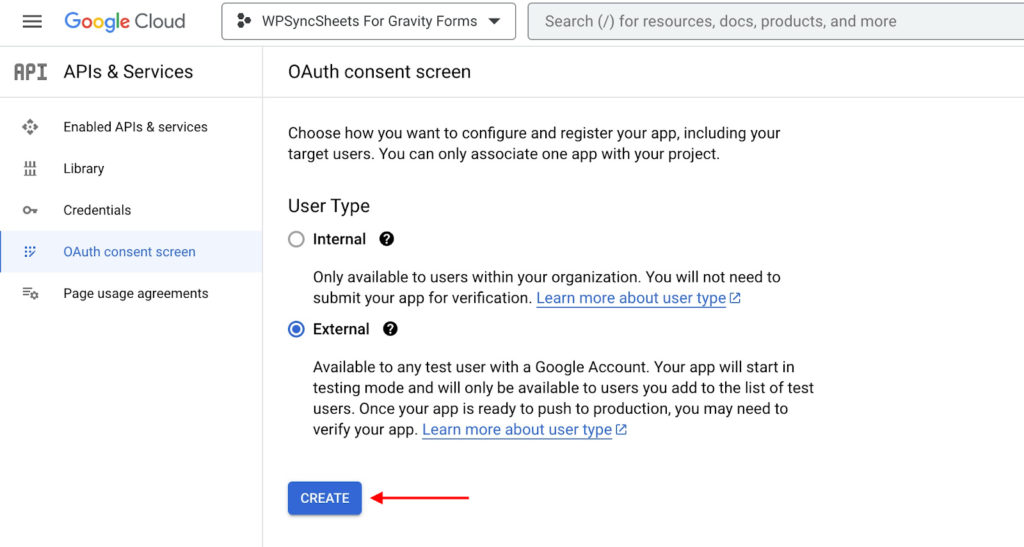
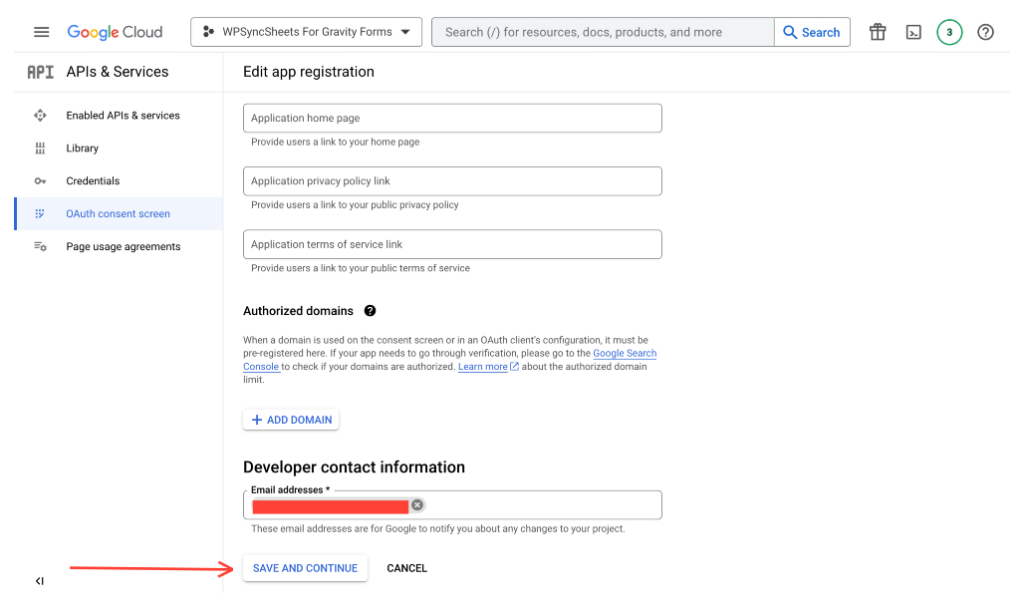
In the next step, enter mandatory information about the App. It takes only four steps to complete this task.
To begin, add your App and Developer related information, such as your App Name, User support email, and Developer email.
Click the SAVE AND CONTINUE button after adding all the necessary information.
On the next screen, you get options to add or remove scopes.
The scope describes which permissions you require users to authorize for your App and what private information you can access from their Google Accounts.
Click SAVE AND CONTINUE once you have checked the option here.
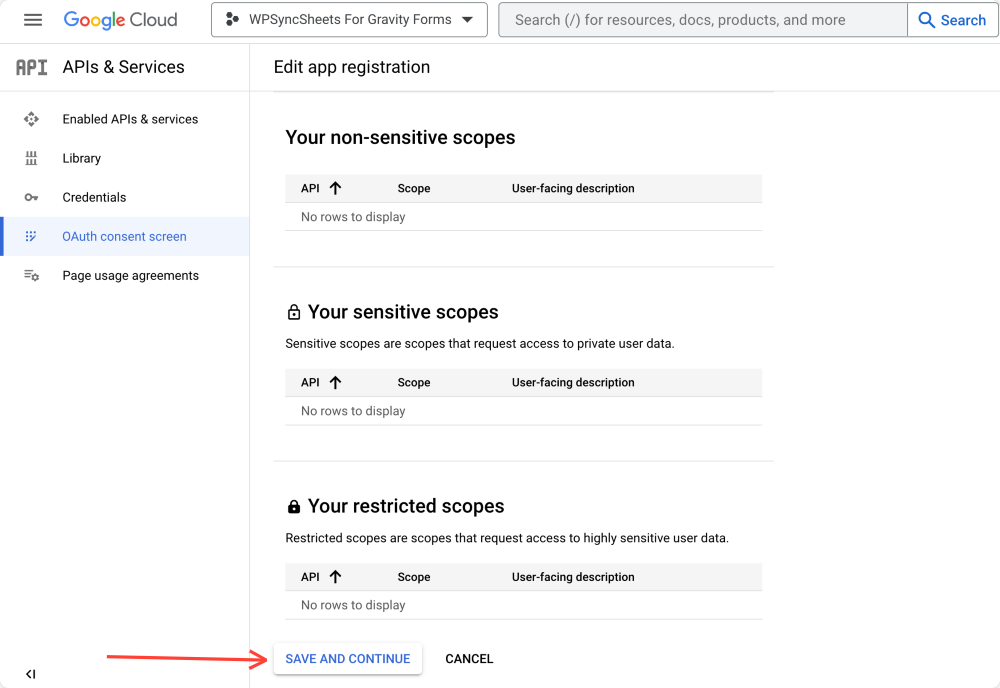
Select the following option, and click SAVE AND CONTINUE.
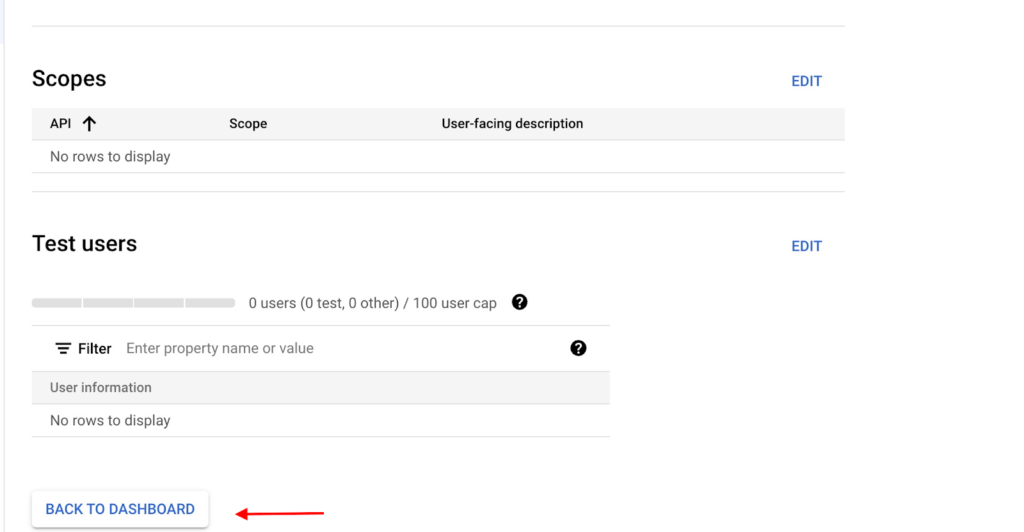
Once you complete the process, click the BACK TO DASHBOARD button.
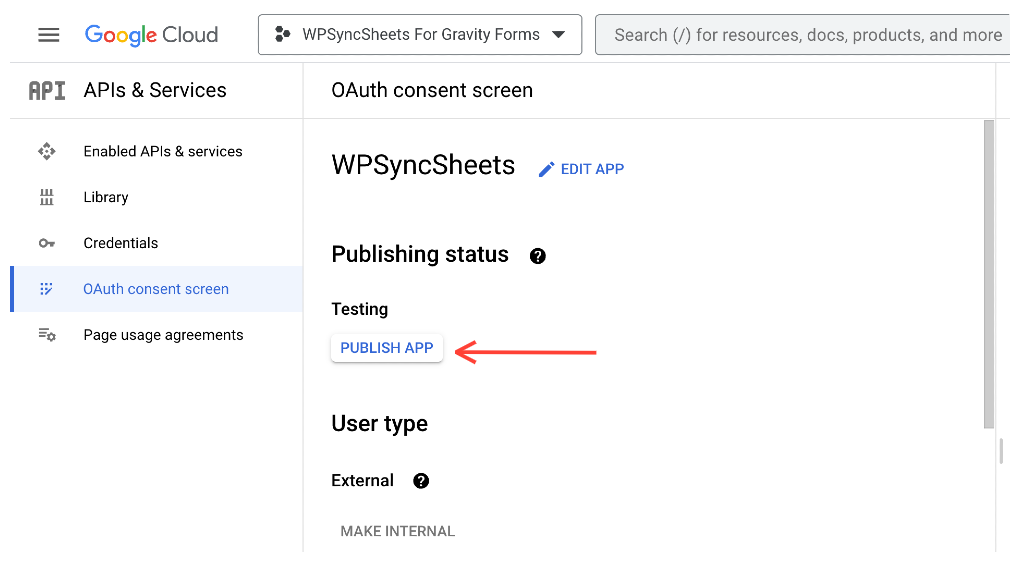
Next, click the PUBLISH APP button.
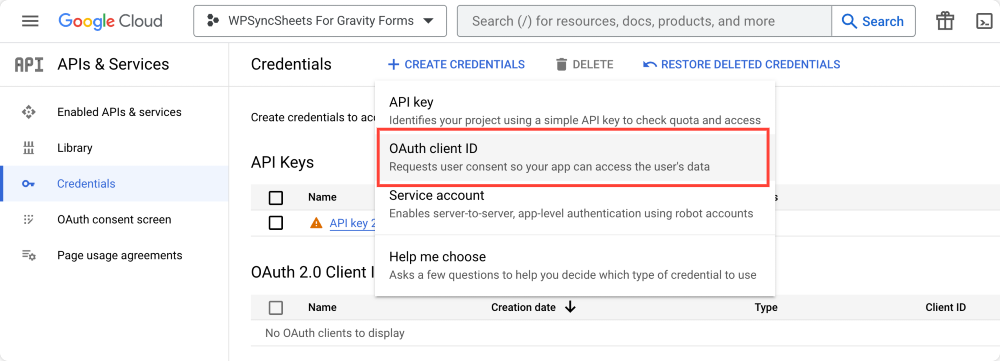
Then navigate to the Credentials tab and click on it to create new credentials.
Click + CREATE CREDENTIALS on the next page and select the OAuth client ID option.
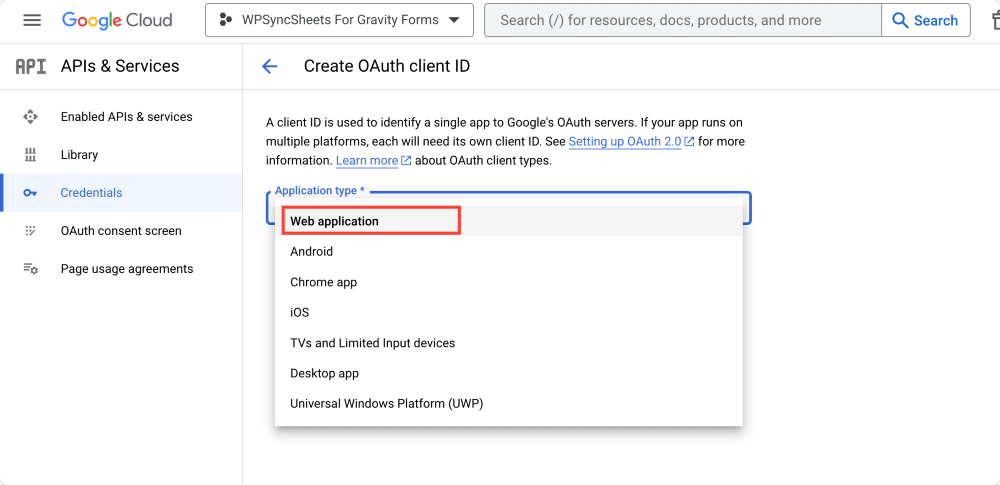
Then, select Web application as the application type.
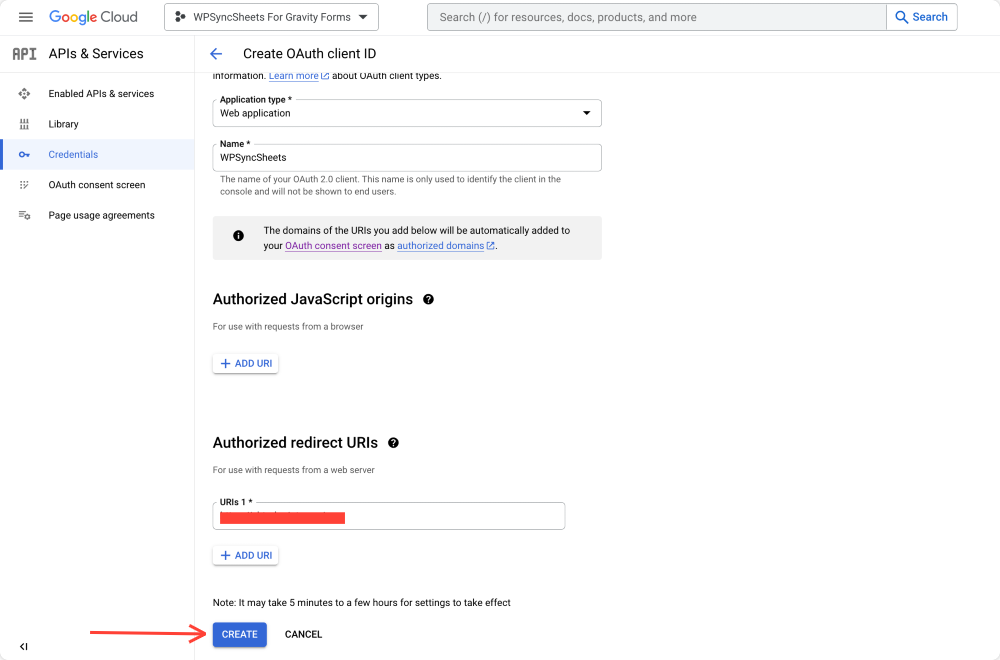
Enter your application name in the Name* tab and the website URL in the Authorized redirect URIs section.
Add all the details, and click on the Create button.
As soon as you hit the Create button, a popup window will pop up with your Client ID and Client Secret.
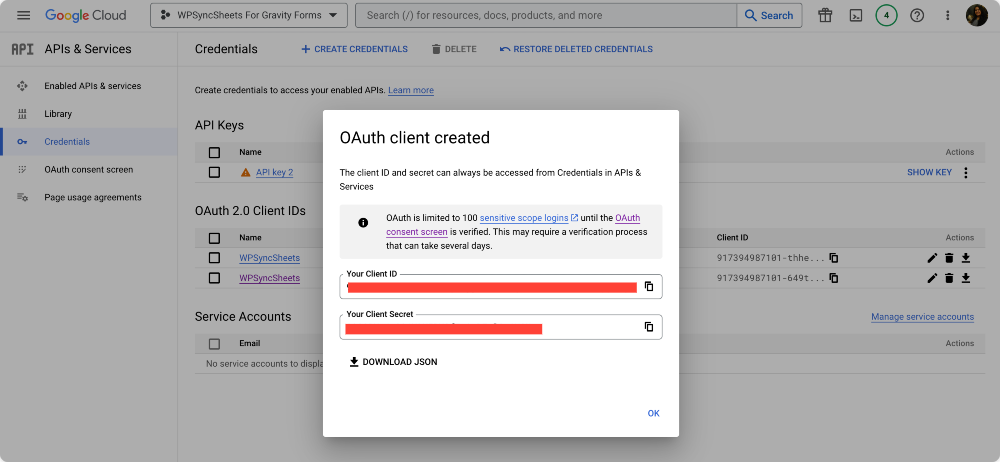
Copy the keys and get back to your WordPress site.
Step 3: Add Google Sheet API Keys to WPSyncSheets Settings
Once you get your Google API keys, you need to add the keys to WPSyncSheets settings to authenticate with your Google account.
To do that, go to your WordPress dashboard, and click WPSyncSheets For WPForms.
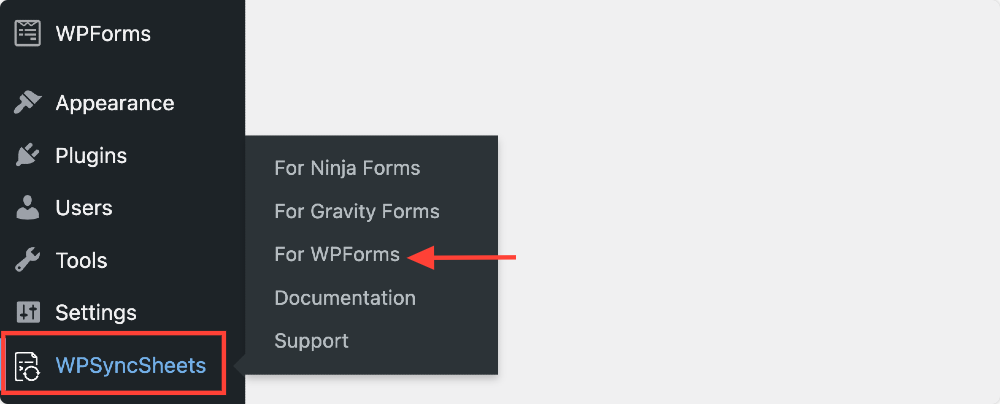
Upon clicking this, you will be taken to the Google API Settings page of WPSyncSheets.
Enter the Client and Client Secret ID in the appropriate fields and click Save.
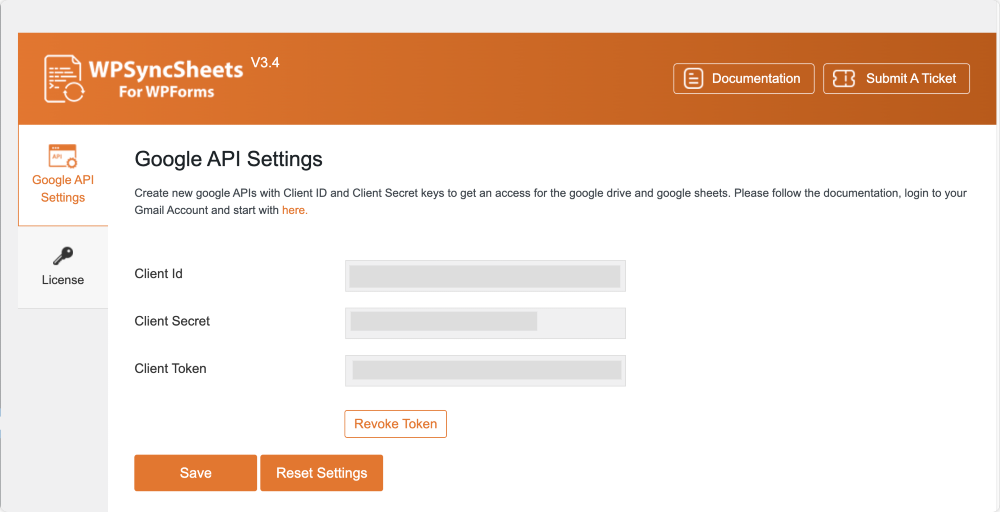
Excellent! You’ve successfully connected your Google account with WPSyncSheets.
Now let’s move to the next step.
Step 4: Create a New Form or Edit Any Existing Form Created using WPForms
Create a new form or edit an existing one.
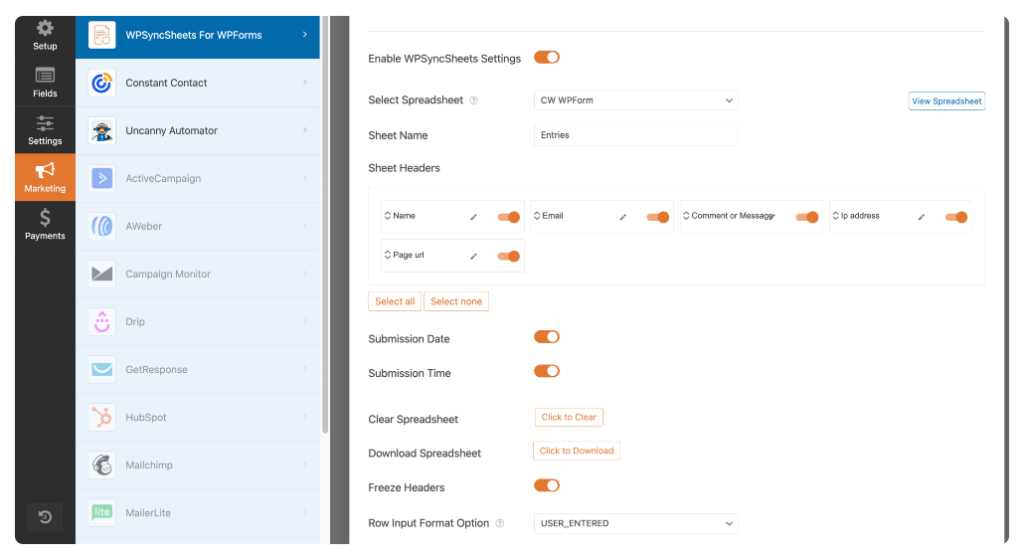
Once you are in the form settings section of WPForms, navigate to the Marketing tab, and click Enable WPSyncSheets Settings.
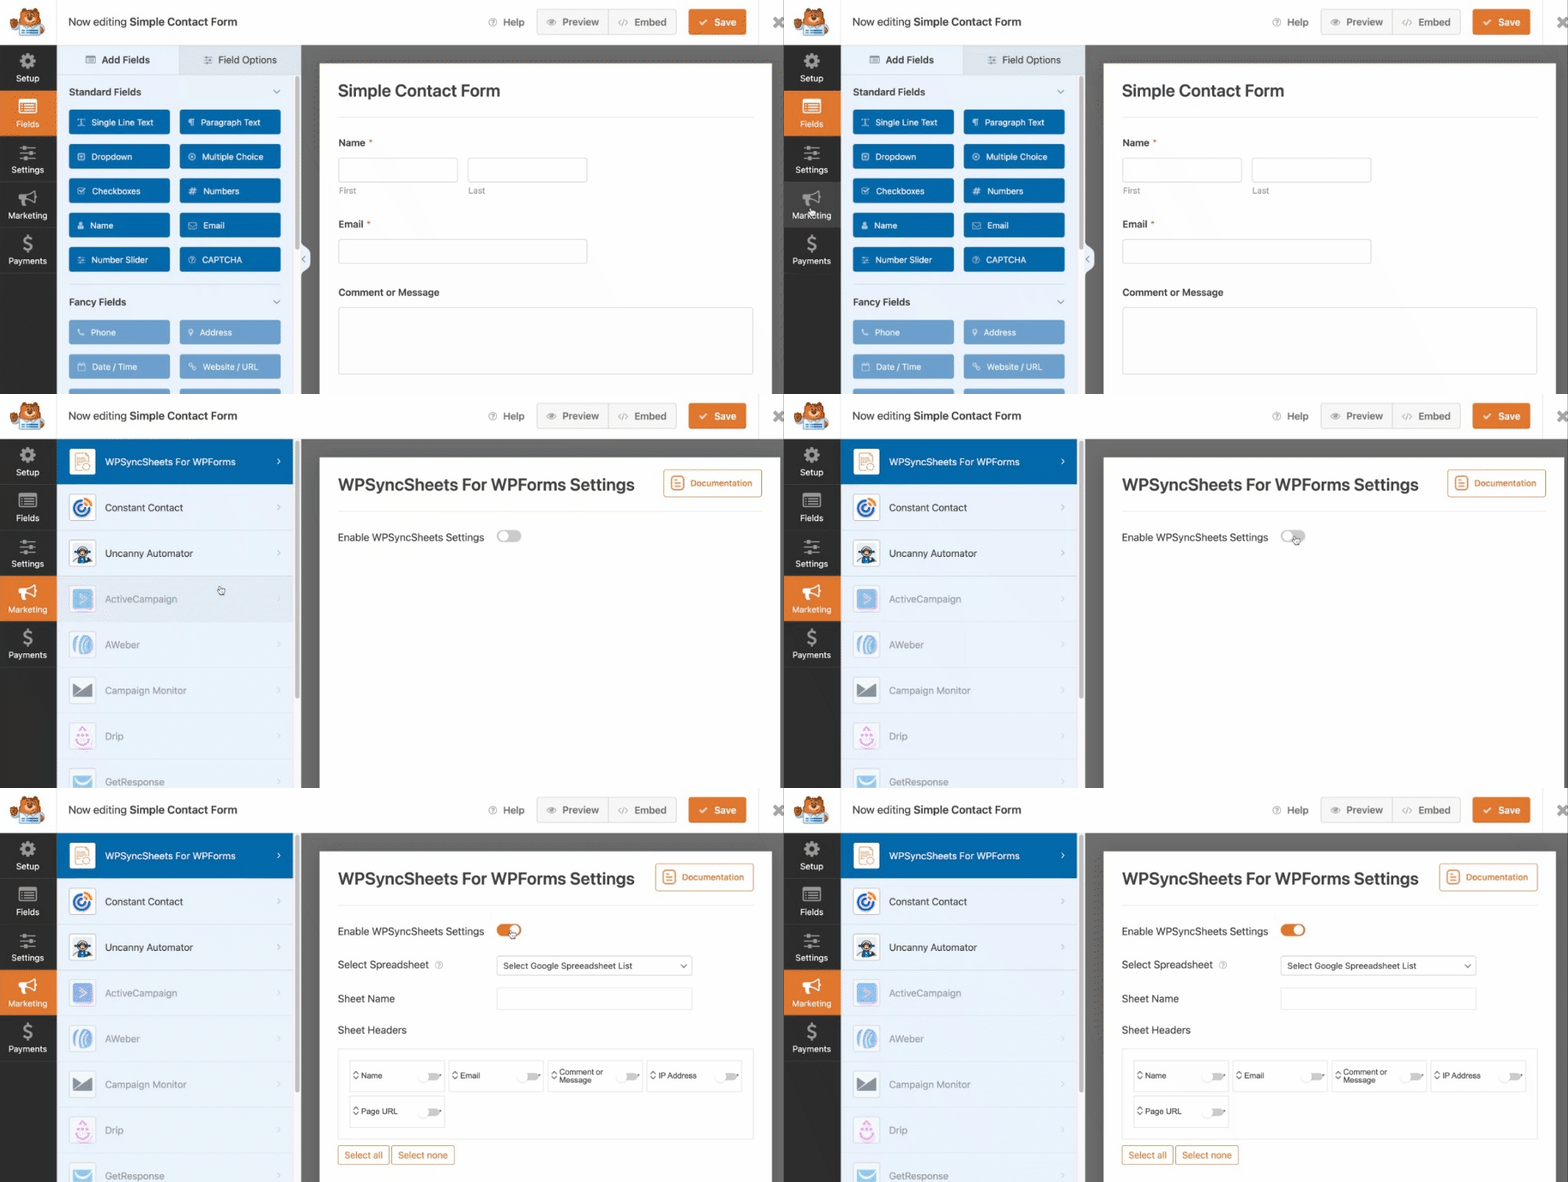
Step 5: Configure WPSyncSheets For WPForms Feed Settings
As soon as you enable the WPSyncSheets Setting option, plenty of features appear.
- Select Spreadsheet: As the name says, you can select your spreadsheet from the drop-down options using this feature.
You can also create a fresh sheet for your entries by choosing the Create New Spreadsheet option.

This feature is useful, allowing you to create a Google Spreadsheet without leaving your current screen or opening your Google Drive.
- Spreadsheets Name: Enter the Spreadsheet name as per your preference.
- Sheet Headers: From here, you can choose your header options such as Name, Email, IP Address, and more to display in the Google Spreadsheet.
- Submission Date: Toggle on this option to display the form submission date on your spreadsheet.
- Submission Time: Toggle on this option to display the form time date on your spreadsheet.
- Freeze Headers: Using the option, you can freeze the sheet’s header row (first row).
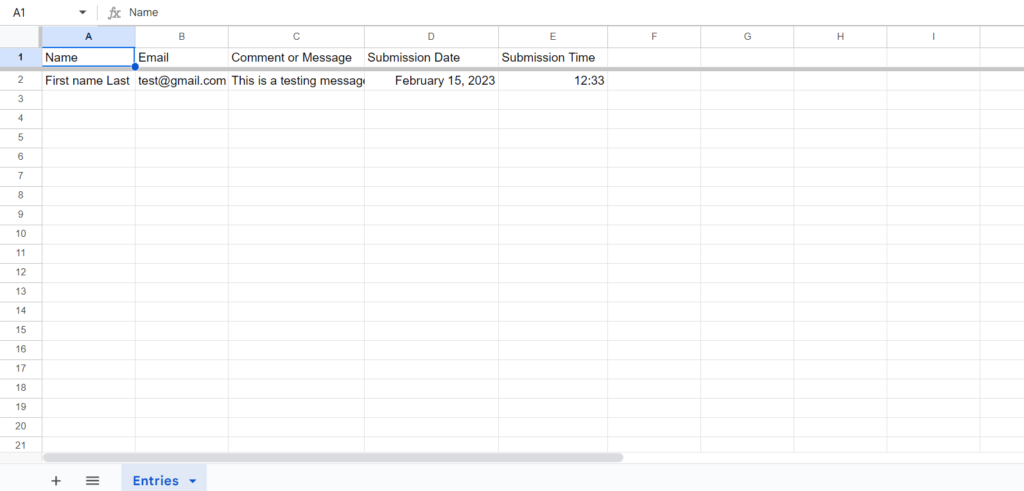
Once you receive form submissions, you can view your spreadsheet directly by clicking on the View Spreadsheet button.
That’s it! WPSyncSheets makes it easy to integrate WPForms with Google Sheets.
Next Learn: How to Connect Google Sheets with Gravity Forms
I hope this step-by-step tutorial will help you easily connect your WPForms with Google Sheets.
Next, if you’re using Gravity Forms and looking for a way to connect it to Google Sheets, check out a detailed tutorial on how to connect Gravity Forms to Google Sheets.
WPSyncSheets is a powerful tool for integrating all popular WordPress form builders with Google Sheets. With WPSyncSheets, you can easily:
- Connect Ninja Forms with Google Sheets.
- Fluent Forms with Google Sheets.
- Contact Form 7 with Google Sheets.
Additionally, WPSyncSheets automatically creates Google Spreadsheets and syncs all Elementor Pro Form entries and WooCommerce orders.


