

Are you looking for ways to export entries from Gravity Forms to Mailchimp?
Gravity Forms is one of the most powerful form plugins out there. The plugin allows you to carry out activities such as collecting lead generation, event registrations, managing user registrations, payment, content submissions, generating quizzes, and even conducting surveys and polls, among other things.
Mailchimp is a powerful email marketing service that allows businesses to manage and automate their email campaigns. It provides tools for audience segmentation, personalized messaging, and performance tracking which helps build stronger relationships with your customers and ultimately drive sales growth.
Customer data collected via Gravity Forms can be exported to Mailchimp by using a built-in export tool in Gravity Forms. You can also use a dedicated export plugin like WPSyncSheets For Gravity Forms when the Gravity Forms export tool is not working.
In this article, we will show you how to use the built-in export tool and the WPSyncSheets For Gravity Forms plugin to migrate contact data into your Mailchimp account.
How to Migrate Data From Gravity Forms to Mailchimp
To migrate data from Gravity Forms to Mailchimp first export the data out of your WordPress website and then import them into your Mailchimp account:
1. Export Customer Data Out of Gravity Forms
You can export data using the built-in export tool or the WPSyncSheets For Gravity Forms. Here’s how:
Use In-Built Export Tool
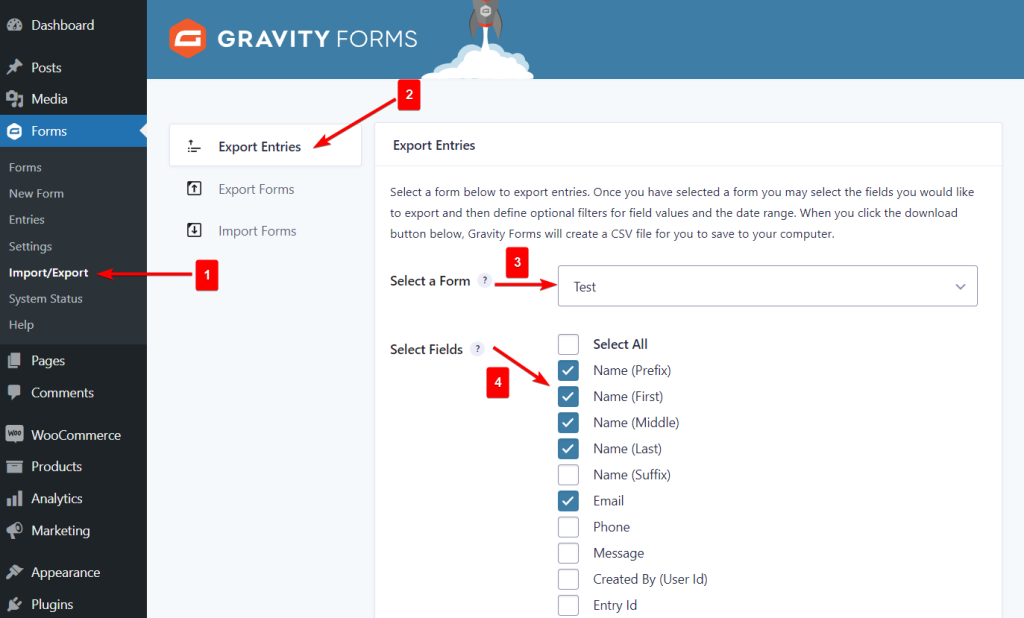
On your WordPress dashboard, go to Forms → Import/Export → Export Entries → Select a Form, and choose the form from the dropdown menu.
Then choose the customer details you want to import into Mailchimp using the Select Fields option.
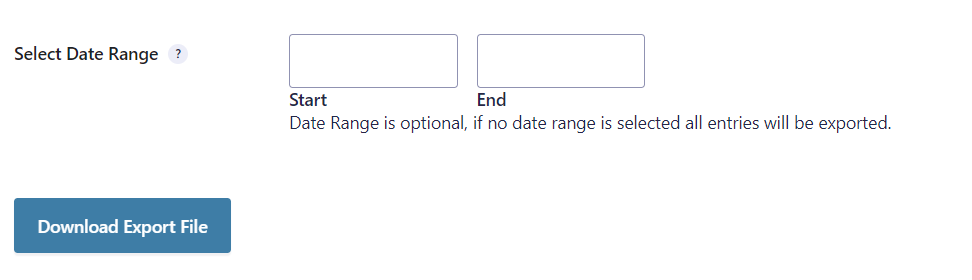
You can select the date range within which you want to export the data. This is optional. When you are ready, hit the Download Export File to download the contact details in a .csv file into your local computer.
For more assistance, take a look at this help doc.
IMPORTANT: The built-in tool is known to fail for reasons like plugin or theme conflicts, JavaScript errors, exceeding PHP max execution time, insufficient PHP memory, and permission issues with the export folder, among other things.
In this case, we recommend using our powerful and user-friendly WPSyncSheets For Gravity Forms plugin. More on this in the next section.
Use WPSyncSheets For Gravity Forms
There is a free version of the plugin as well as a paid version. The free version allows the export of customer data into a Google Excel spreadsheet which can be downloaded as a .csv file and then imported into Mailchimp.
The paid version allows the import of data into your WordPress website. It also allows scheduling auto import, auto export, and updating entries, among other things. You don’t need the paid version of the plugin to export Gravity Forms entries so in this tutorial, we are using the free plugin to demonstrate.
i. Install & Activate WPSyncSheets For Gravity Forms
Download the free plugin from here and on your WordPress dashboard go to Plugins → Add New Plugin → Upload Plugin and install and activate the plugin on your WordPress website.
ii. Connect Your Site With Google Drive
We mentioned earlier that Gravity Forms exports data into Google Sheets and that’s why it’s important to connect your website with your GDrive where the Google Sheets will be generated.
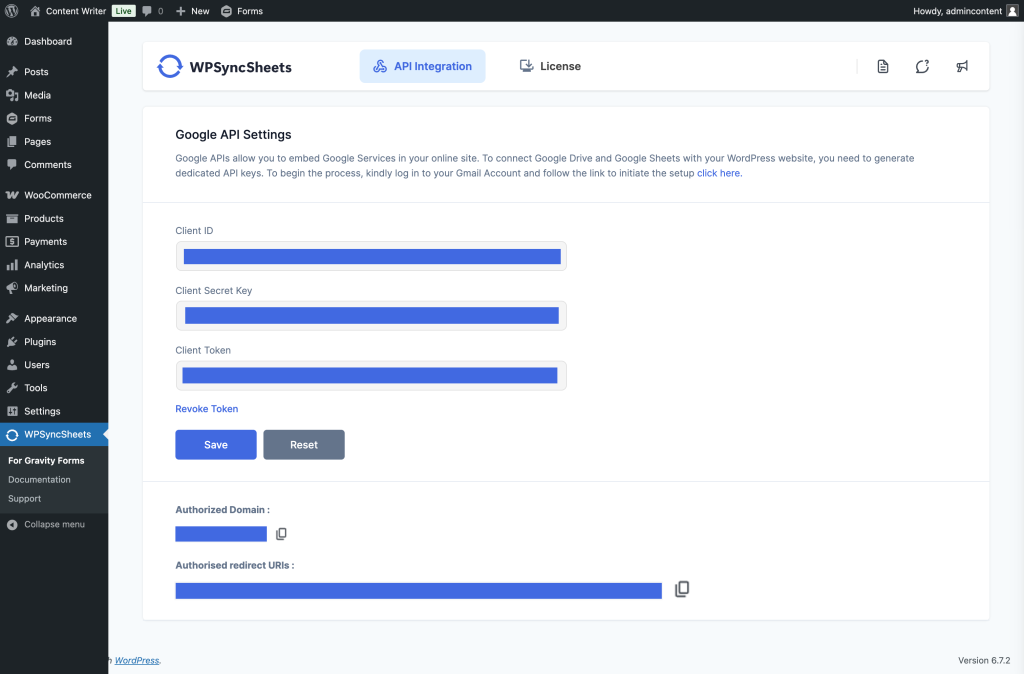
To establish that connection you need to enable Google Drive API and Google Sheets API from your Google Clouds Platform and then generate Client ID, Client Secret Key, and Client Token. Here’s a guide to help you.
Once you have the ID, secret key, and token, go to WPSyncSheets For Gravity Forms Settings → API Integration and add them to the page.
iii. Export Gravity Forms Data Into Google Sheets
Now, let’s export customer data from your Gravity Forms to Google Sheets.
On your WordPress website, go to Forms → Entries → Settings → WPSyncSheets → Add New.
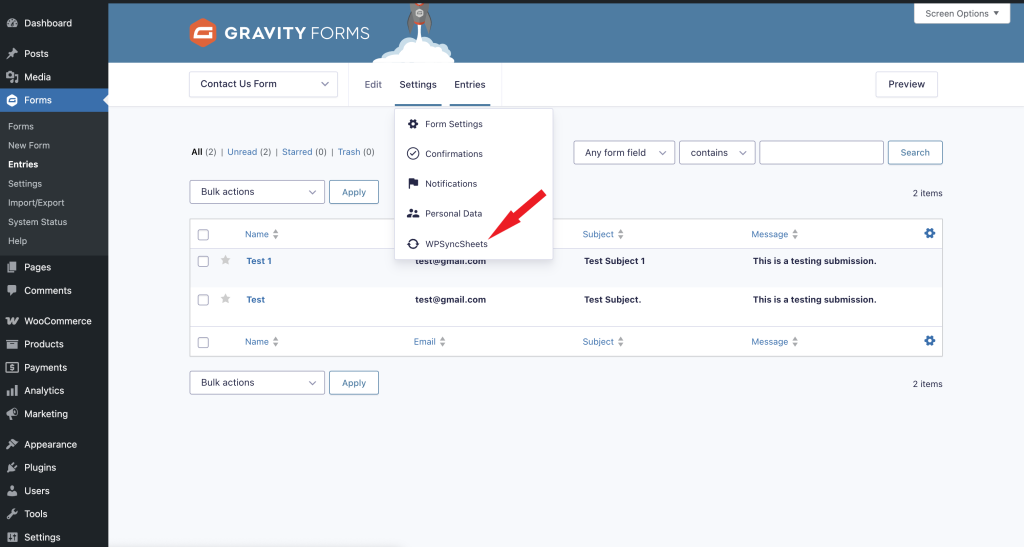
Then proceed to generate, a new Google Sheets by taking the following steps:
- Select the Create New Spreadsheets option
- Add a name to the Google Sheets
- Add a Sheet Name
- Select the Set Default Headers As Per the Form Fields
- Hit the Create New Spreadsheets button
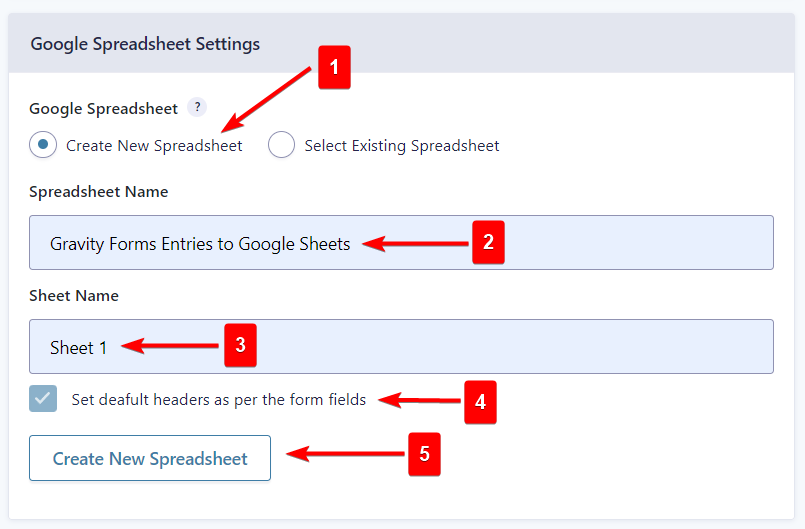
Next, go to Export Entries Settings → Click to Sync and your Gravity Forms data will be exported into Google Sheets.
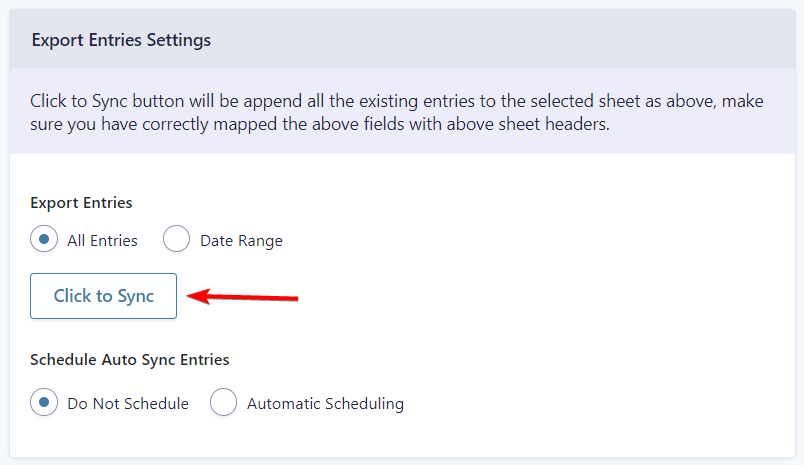
In the final step, scroll up to the Google Spreadsheet Settings option, and hit the View Spreadsheets button to open the Google Sheets in a new tab.
That’s it. You would have exported Gravity Form entries by now.

Need help? Follow this guide: Gravity Forms to Google Sheets
2. Import Customer Data Into Mailchimp
To import your customer data into Mailchimp you need to prepare the spreadsheet that is to be imported.
The data that you exported into Google Sheets in the previous step has to be formatted according to Mailchimp’s guidelines because certain types of fields, like birth dates and email addresses, require a specific format for Mailchimp to import them correctly.
Mailchimp already has an excellent guide on formatting. Please follow that to format the spreadsheet: Mailchimp Contact Data Format Guidelines.
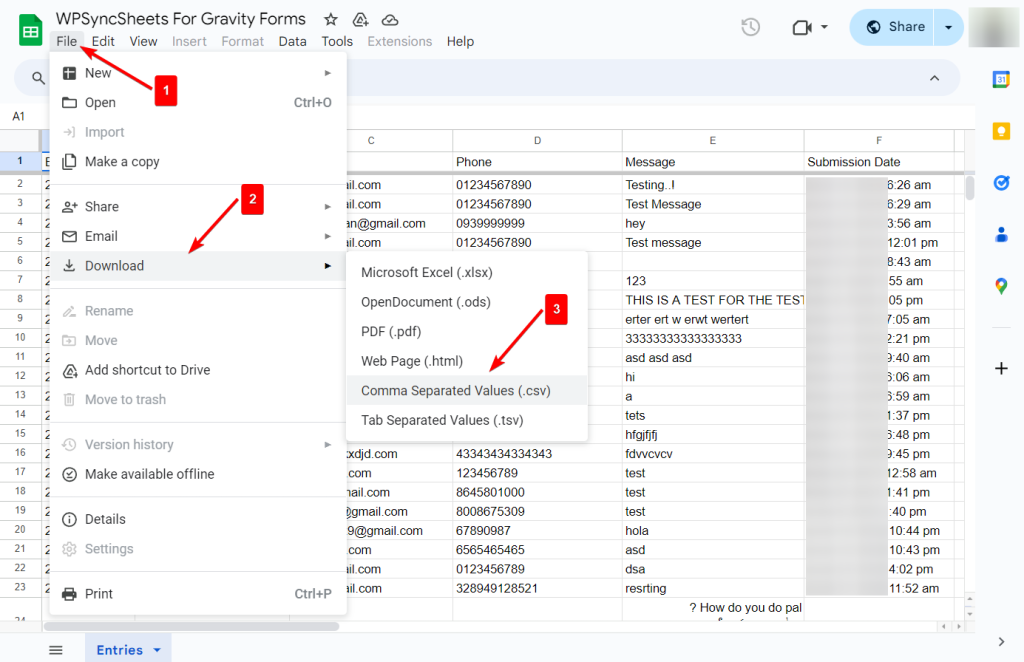
After the formatting is complete, you need to download the spreadsheet to your local computer in .csv or .txt file formats because Mailchimp only allows the import of contact data in those file formats.
Just go to File → Download → Comma Separated Values (CSV) and the spreadsheet will be downloaded to your local computer in .csv format.
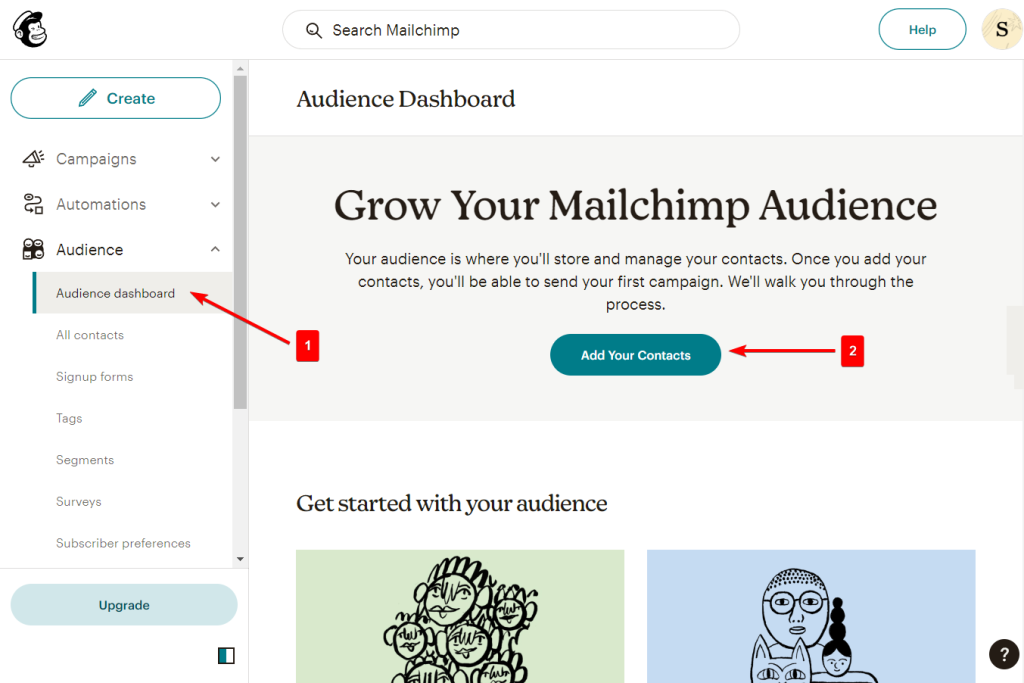
Now, log into your Mailchimp account, go to Audience → Audience Dashboard, and select the Add Your Contacts button.
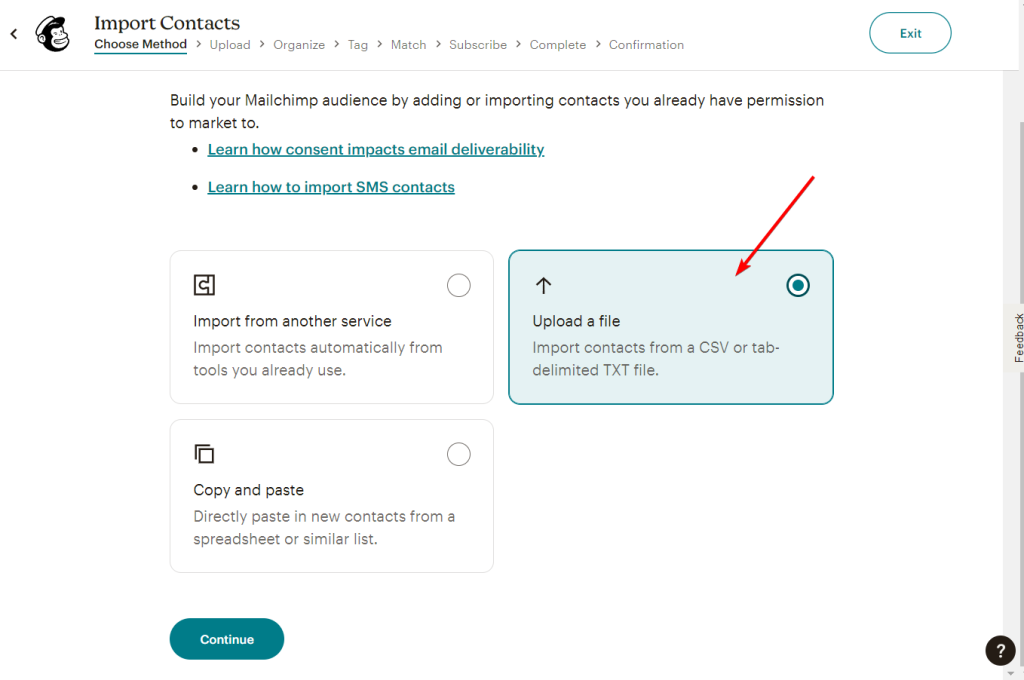
On the next page, upload the .csv file from your local computer using the Upload a File option.
If you want to update email contacts that are already in your Mailchimp account, check the box next to Update Any Existing Contacts.
Mailchimp will automatically match the columns in your .csv file with the ones in your Mailchimp audience. In case it can’t match some columns, it will ask for manual matching.
After that, the import will begin. It will take only a couple of seconds for the import to complete.
If you need more assistance importing the contact data, please follow their official help doc: Import Contacts to Mailchimp.
And that’s it, folks! Now you know how to import contacts to Mailchimp from Gravity Forms.
Conclusion
Gravity Forms is one of the most powerful form plugins out there. It doesn’t just allow website owners to collect contact messages but also build a subscriber list, allows visitors to register, submit content, generate quizzes, conduct surveys, and a lot more.
The form plugin is loaded with features and it even offers an import-export tool that can be used to export custom data out of your website to transfer them into your Mailchimp account.
Unfortunately, the import-export tools are known to stop working especially when dealing with a large number of data. So if you encounter any issues exporting customer data, we recommend using our WPSyncSheets For Gravity Forms plugin.
It allows you to import and export Gravity Form entries in and out of your website using Google Sheets. It’s a powerful user-friendly plugin, constantly updated, and offers stellar support from the development team.
Try WPSyncSheets For Gravity Forms today!
Have any questions about Mailchimp Gravity Forms integration? Please let us know in the comment section below.
Frequently Asked Questions (FAQs)
How to send Gravity Forms data from WordPress to Mailchimp?
To send Gravity Forms data from WordPress to Mailchimp use our WPSyncSheets for Gravity Forms plugin.
All you need to do is purchase the plugin and then install and activate it on your WordPress website. Next, connect your website to your Google Drive account by enabling the Google Drive API in your Google Cloud account, generating credentials, and entering them in the WPSyncSheets Settings → API Integration page. Then go to Forms → Entries, select your form, and generate a new Google Sheet under Settings → WPSyncSheets. It will export all your contact details.
Format the data in Google Sheets, then download it as a .csv file. Import into Mailchimp by going to Audience → Audience Dashboard → Add Your Contacts and upload the .csv file into your Mailchimp account. That’s it.
How to connect Gravity Forms with Mailchimp?
You can use the Gravity Forms MailChimp add-on to connect the form with Mailchimp. For the import-export of data between your WordPress website and your Mailchimp account, we recommend using our WPSyncSheets for Gravity Forms plugin. It’s a powerful user-friendly plugin, constantly updated, and offers stellar support from the development team.


