

Are you looking for ways to migrate entries from Contact Form 7 to Google Sheets?
Contact Form 7 is one of the oldest and most popular contact form plugins for WordPress websites.
It’s a simple tool for collecting contact details but with the help of other third-party plugins, the tool can transform into a powerful form management system, capable of handling complex form logic, conditional fields, and file uploads. It can even integrate with popular marketing automation tools, email services, and CRM systems.
When exporting Contact Form 7 data out of your WordPress website, you can use WordPress’s native export tool. However, the data can be exported only in .xml files, not Google Sheets.
To export entries from Contact Form 7 to Google Sheets, you need to rely on a third-party plugin like WPSyncSheets For Contact Form 7.
It’s a powerful plugin that allows you to manage Contact Form 7 data using Google Sheets, instruct which data to export and which ones to skip, track the date and time the form entry was submitted, and insert uploaded files as links, among other things.
In this article, we are going to show you how to use the WPSyncSheets For Contact Form 7 plugin to migrate the form data out of your WordPress website.
Let’s get started.
Why Export Contact Form 7 Data to Google Sheets
Common reasons for exporting data from Contact Form 7 to Google Sheets are:
- Manage all your form submissions in one place, easily to track, analyze, and respond to leads
- Analyze and visualize the data using Google Sheets’ built-in functions, such as charts, filters, and pivot tables
- Easily share data with team members or stakeholders, facilitating collaboration
- Exporting form data to Google Sheets offers a safety net, in case your WordPress site is compromised or data is lost
- Reduce manual data entry, saving time and minimizing errors
- Access your form data from anywhere, on any device, through Google Sheets’ cloud-based platform
- Track changes and maintain a history of your data over time, which can be useful for auditing or trend analysis
- Combine Contact Form 7 data with information from other sources in Google Sheets for more comprehensive analysis
- Use Google Sheets as an intermediary step when migrating data between different systems or platforms, and more
How to Export Entries From Contact Form 7 to Google Sheets
We are going to use our plugin WPSyncSheets For Contact Form 7 to migrate data out of your WordPress website.
There is a free version of the plugin as well as a paid one. The plugin is a paid one and comes at an annual cost of $49 for a single website. You
The free plugin has some limitations for instance you cannot edit sheet headers, and cannot show PayPal or Stripe status among other things.
In the tutorial below, we are using the paid plugin but you don’t need the paid plugin to follow the tutorial. Free plugin users can also carry out the steps listed below.
Let’s dive into the tutorial.
1. Install & Activate WPSyncSheets For Contact Form 7
Whether you are using the free plugin or the paid one, the first step is to download the plugin to your local computer.
Then Install and activate the plugin on your WordPress website by going to Plugins → Add New Plugin → Choose File → Install Now.
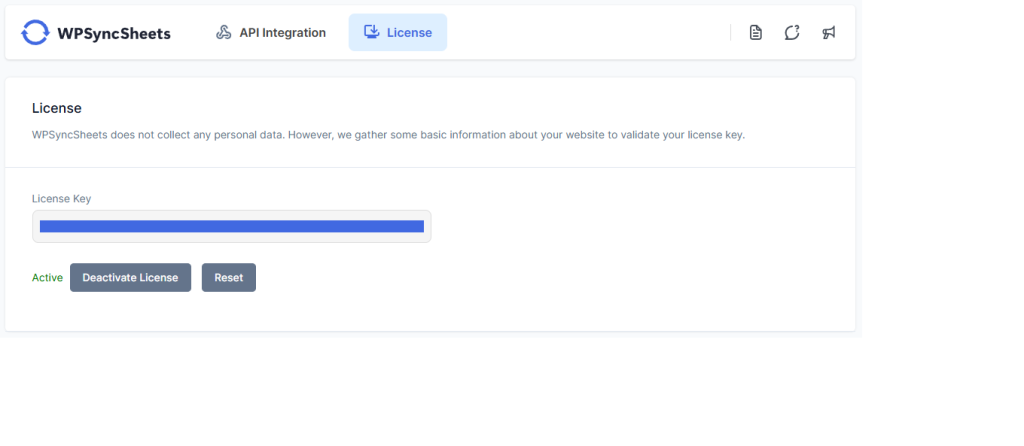
Next, find your unique license from your WPSyncSheets account or the welcome email you received upon purchasing the plugin, and then add it to your website to activate the license. Go to WPSyncSheets → For Core → License.
2. Connect Your Website With GDrive
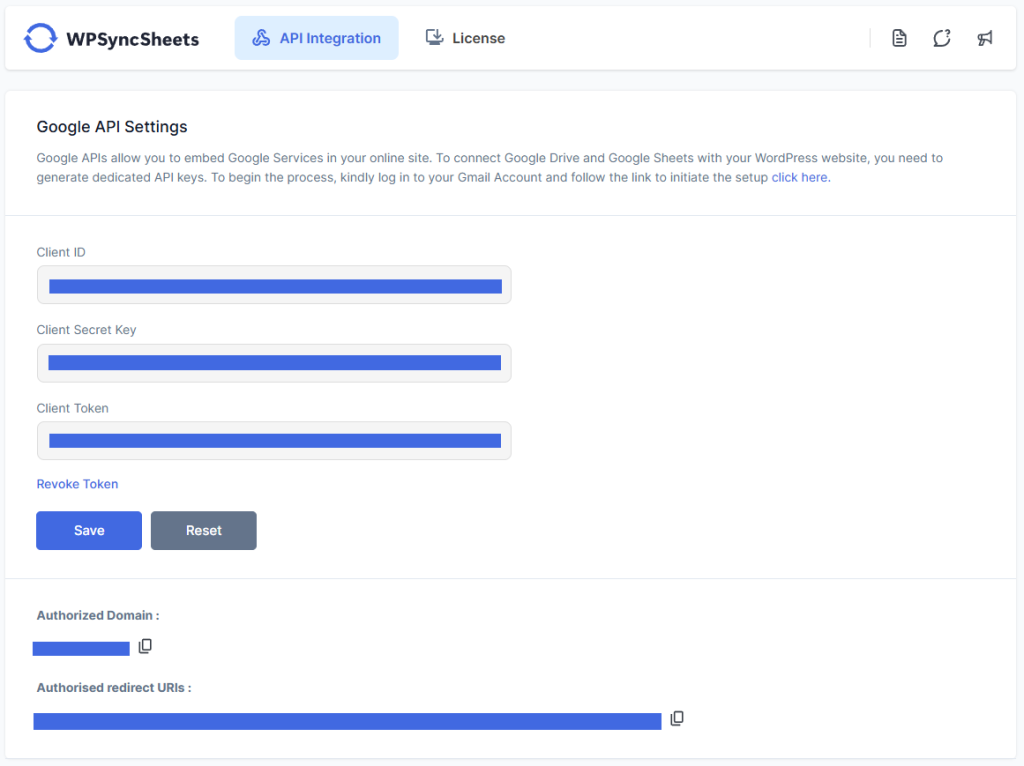
To export Contact Form 7 data into Google Sheets, you need to connect your website to your GDrive account so that it can generate a Google Sheet on your GDrive.
The trusted Google API integration will help connect your website and GDrive together.
On your WordPress dashboard, go to WPSyncSheets → For Contact Form 7 → API Integration. You will see that the plugin needs a Client ID, Secret Key, and Token to connect with your GDrive. These have to be generated from your Google Clouds Platform.
We have a separate guide on how to do just that. Kindly follow the guide and once you have the ID, Secret Key, and Token, return to your website and add them to the Google API Settings page.
That will immediately connect your website with GDrive.
3. Export Contact Form 7 Entries to Google Sheets
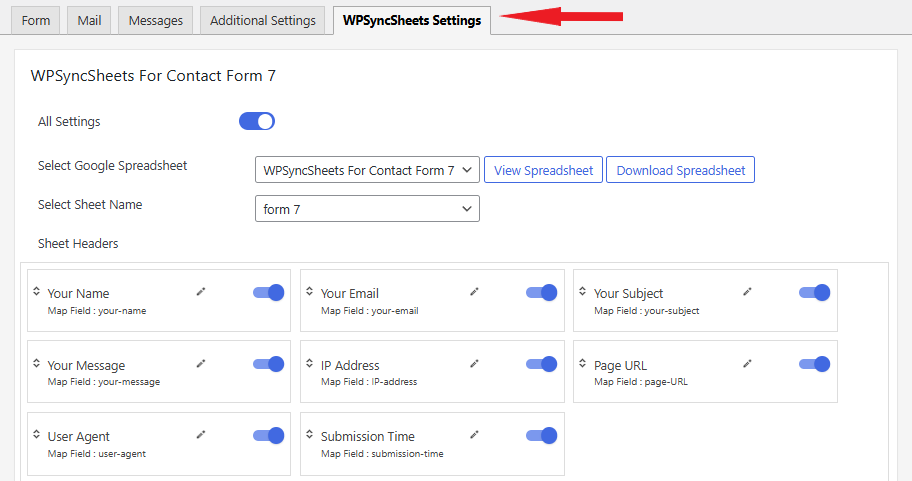
To start the export, go to Contact → Contact Forms and Edit the contact form of your choice. You should be able to see a new WPSyncSheets Settings tab on the page. Select that.
i. Generate a Google Sheet
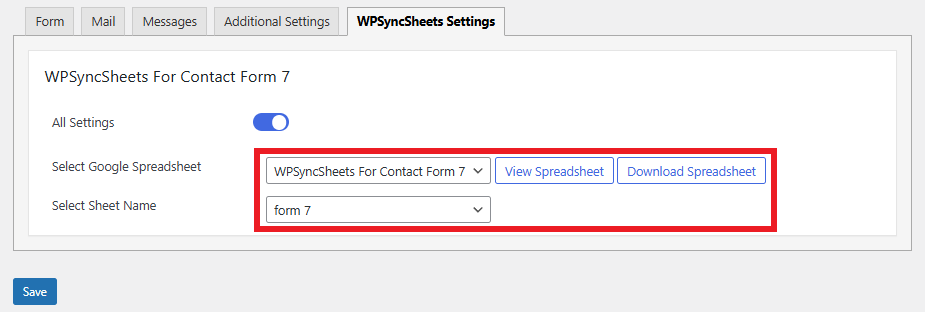
The first thing you need to do is go to Select Google Spreadsheet, and from the dropdown menu choose the Create New Spreadsheet option.
Next, in the Enter Spreadsheet Name option, insert a name for the Google Sheets you will be exporting data into (Example: Export Contact Form 7 Data).
All Google Sheets contain sub-sheets. You need to enter a name for a sub-sheet in the Enter Sheet Name (Example: Entries) and hit the Save button.
Some new setting options will populate the page, let’s take a look at them.
ii. Modify Settings
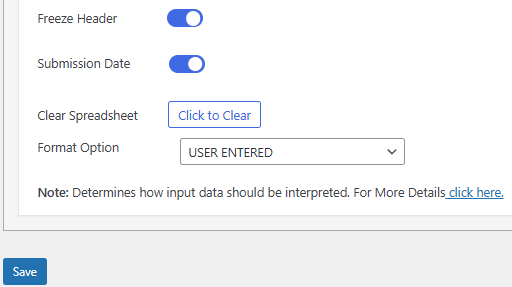
First off, you have the Sheet Headers. It refers to the title of the columns that would appear in the Google Sheets with exported data.
The sheet headers are automatically set following the form fields available in Contact Form 7.
We recommend taking a good look at the sheet headers and then enabling or disabling the headers as per your requirement.

Next, comes Freeze Header. As the name suggests, it allows you to freeze the sheet headers so that when you are scrolling down on your Google Sheets, the header remains fixed and is never out of sight.
You can choose to remain or remove the submission data of the data entries using the Submission Date option.
And use the Clear Spreadsheet option to delete all the data exported to the Google Sheets. You might need to use this option someday later. For now, there’s no need to use this so skip it.
When you are ready, hit the Save button.
iii. Open Google Sheet
By now WPSyncSheets For Contact Form 7 would have generated a Google Sheets with the name you entered in an earlier step. Open the spreadsheet by selecting the View Spreadsheet button.
You can also download the spreadsheet using the Download button. It will be downloaded to your local computer in the .xlsx format.
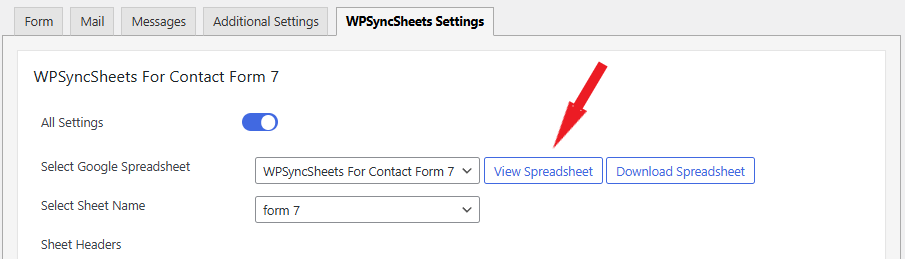
The Google Sheet will open in a new tab and it should be populated with data from Contact Form 7.
And that’s it, folks. You now know how to export entries from Contact Form 7 to Google Sheets.
Conclusion
Exporting contact form data from your website to Google Sheets is a great way to manage submissions in one place, share data with teammates and other collaborators without giving them access to your website, store important data off-site, reduce manual work, and minimize error, among other things.
While WordPress has an in-built export tool, it exports Contact Form 7 data in .xml format only.
To export data in Google Sheets directly from your website, you need a powerful third-party plugin like WPSyncSheets For Contact Form 7.
There is a free version of the plugin that allows unlimited exports no matter how big your data is. But you need the premium version of the plugin to migrate PayPal and Stripe status exports, among other things.
Try WPSyncSheets For Contact Form 7 today!
If you have any questions about how to export Contact Form 7 Google Sheets, let us know in the comment section below.
Frequently Asked Questions (FAQs)
Can Contact Form 7 export entries?
Yes, Contact Form 7 entries can be exported using the in-built WordPress export tool but it exports only in the .xml format. To export data in Google Sheets or .xlsx format, you need to use a third-party plugin like WPSyncSheets For Contact Form 7. There is a free version of the plugin and paid version. The paid version allows editing of sheet headers, export of PayPal and Stripe status, and saving files, among other things.
How to send Contact Form 7 data to Google Sheets?
To send Contact Form 7 data to Google Sheets, you need a plugin like WPSyncSheets For Contact Form 7 because WordPress’ built-in export tool does not allow export in Google Sheets.
Just install the WPSyncSheets plugin into your website and connect your site with your GDrive account. Then go to Contact → Contact Forms and Edit the contact form of your choice. In Select Google Spreadsheet, choose the Create New Spreadsheet option and enter a name for your Google Sheets in the Enter Spreadsheet Name option followed by the name of the sub-sheet in the Enter Sheet Name option. A Google Sheet will be generated all your contact data will be exported in the sheet. Open the Google Sheets by selecting the View Spreadsheet button.
How to upload Contact Form 7 data to GDrive?
To upload Contact Form 7 data into GDrive, you need a plugin like WPSyncSheets For Contact Form 7. Just install the WPSyncSheets plugin into your website and connect your site with your GDrive account. Then go to Contact → Contact Forms and Edit the contact form of your choice. In Select Google Spreadsheet, choose the Create New Spreadsheet option and enter a name for your Google Sheets in the Enter Spreadsheet Name option followed by the name of the sub-sheet in the Enter Sheet Name option. A Google Sheet will be generated all your contact data will be exported in the sheet. Open the Google Sheets by selecting the View Spreadsheet button.


